Preacher Curl Bench Assembly Guide for Hotel Gym Suppliers
A preacher curl bench is never "assemble and forget."
Proper preacher curl bench assembly requires precise pad angle calibration within a narrow tolerance, base plate leveling on often-uneven hotel gym floors, controlled bolt torque sequencing, and deliberate hinge play adjustment—each step directly shaping guest comfort and equipment lifespan in high-traffic environments.
I still remember standing in a five-star hotel fitness center in Jakarta, watching a newly installed batch of preacher curl benches get torn down within hours of sign-off. Trainees had already complained: elbows floating mid-curl, zero leverage, discomfort radiating through the forearms. The pad angle was off by roughly two degrees—barely visible to the eye, yet catastrophic for the user experience. That single dimension on a factory drawing became the difference between a machine guests loved and one they avoided. [NEED_CITE: pad angle deviation impact on biceps brachii isolation efficiency] Since then, across hotel gym fit-outs in Vietnam, Thailand, and Indonesia, I have learned that every bolt, every shim, every degree of hinge rotation carries weight far beyond the spec sheet.

What follows is a field-tested breakdown of how to get preacher curl bench assembly right the first time—no rework, no guest complaints, no callbacks.
Why Does Pad Angle Matter More Than Frame Stability?
Pad angle is the single most influential variable in preacher curl bench assembly for user comfort and muscle isolation.
The preacher curl pad is designed to fix the upper arm against a sloped surface, eliminating shoulder momentum and forcing the biceps to do the work. When the pad angle deviates even slightly from its intended range, the elbow loses full contact with the pad surface. This creates what lifters call "elbow float"—a subtle but destructive loss of leverage that shifts load away from the biceps peak and into the forearm flexors. [NEED_CITE: biomechanical effect of preacher curl pad angle on elbow contact pressure]
In the Jakarta project, the entire batch required rework because the pad angle tolerance had not been verified post-assembly. Factory drawings showed the correct angle, but shipping vibration, handling stress, and minor frame distortion during transit had shifted the mounting bracket. The deviation was within what most installers would consider negligible—yet trainees felt it immediately.
The correct approach during preacher curl bench assembly is to measure the pad angle with a digital inclinometer after the bench is fully positioned on the gym floor, not on the assembly table. Place the inclinometer flat against the pad surface at its center line. The optimal angle should fall within a narrow tolerance band—typically between the low thirties and low forties in degrees, depending on the specific model design. Any deviation beyond the upper limit of that band requires bracket adjustment before the bench is cleared for guest use.
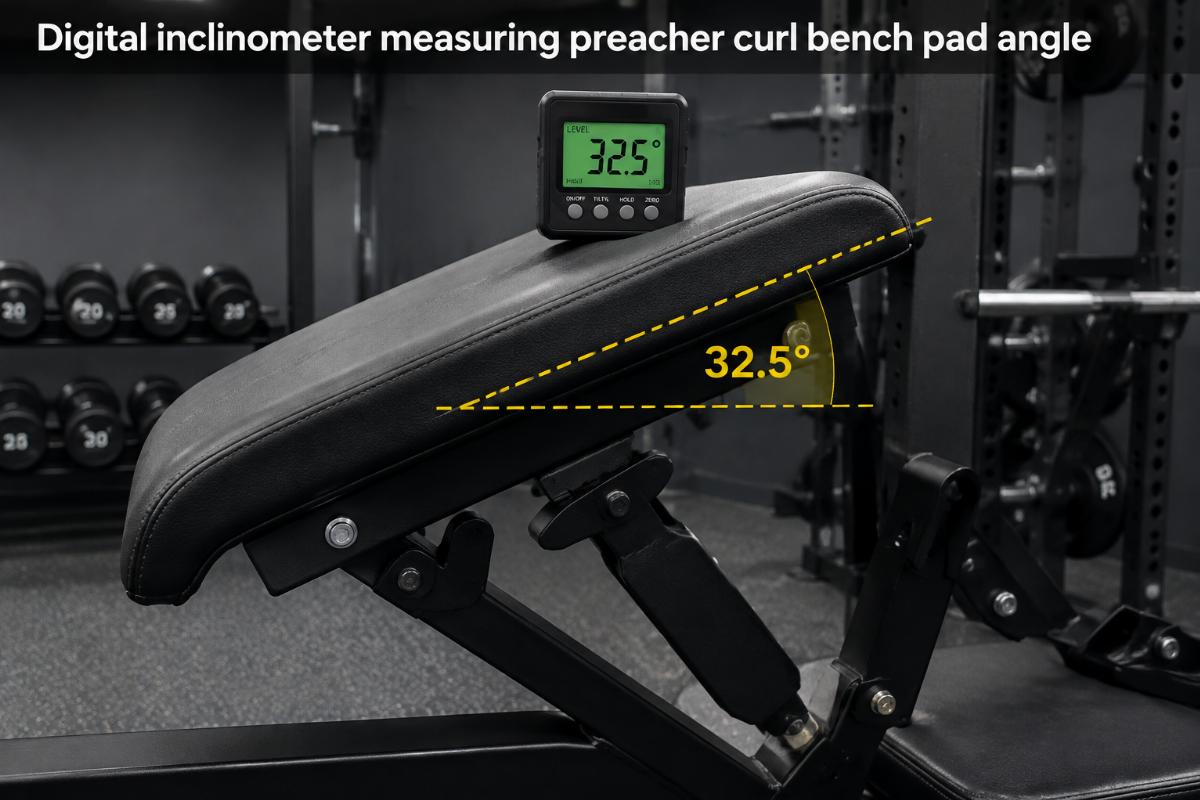
Hotels with high guest turnover cannot afford even a single bench producing substandard curl mechanics. One complaint spreads fast on travel review platforms; one avoided complaint is worth more than the five minutes it takes to verify the angle.
How to Level the Base Plate on Uneven Hotel Gym Floors?
Base plate leveling is a non-negotiable step in preacher curl bench assembly that prevents frame wobble, uneven pad wear, and long-term structural fatigue.
Hotel gym floors are rarely perfectly level. Design drawings often specify "level surface," but the reality on-site is different: concrete slabs with subtle crowns, tile transitions, rubber flooring compression zones, and drainage slopes all create micro-irregularities beneath the bench feet. Skipping base plate leveling during preacher curl bench assembly guarantees that the frame will rock under load—sometimes immediately, sometimes after weeks of guest use as the rubber feet compress unevenly.
In a Vietnam resort gym project, the installation team assumed the newly poured concrete floor was level because it looked flat. They bolted the preacher curl bench directly to the floor without shimming. Within weeks, guests reported a noticeable wobble during heavy curls. Inspection revealed that one corner of the base plate was sitting on a slab high spot while the diagonal corner had a gap beneath it. The frame had been flexing with every rep, accelerating wear on the hinge bushings and loosening the mounting bolts.
The correct leveling procedure during preacher curl bench assembly involves the following steps:
- Position the bench on the intended gym floor location without any fastening.
- Place a precision spirit level or digital level across the base plate in both the longitudinal and lateral directions.
- Identify the high and low corners by observing which feet bear full contact and which show gaps.
- Insert stainless steel shims beneath the low feet. Shim thickness should be selected from a range that covers typical slab irregularities—thin shims for minor deviations, stacked shims for more pronounced slopes.
- Re-check the level after each shim adjustment. The base plate must read level in both axes before any anchor bolts are tightened.
- Once level, secure the base plate with the specified anchor pattern and re-verify that no shift occurred during fastening.
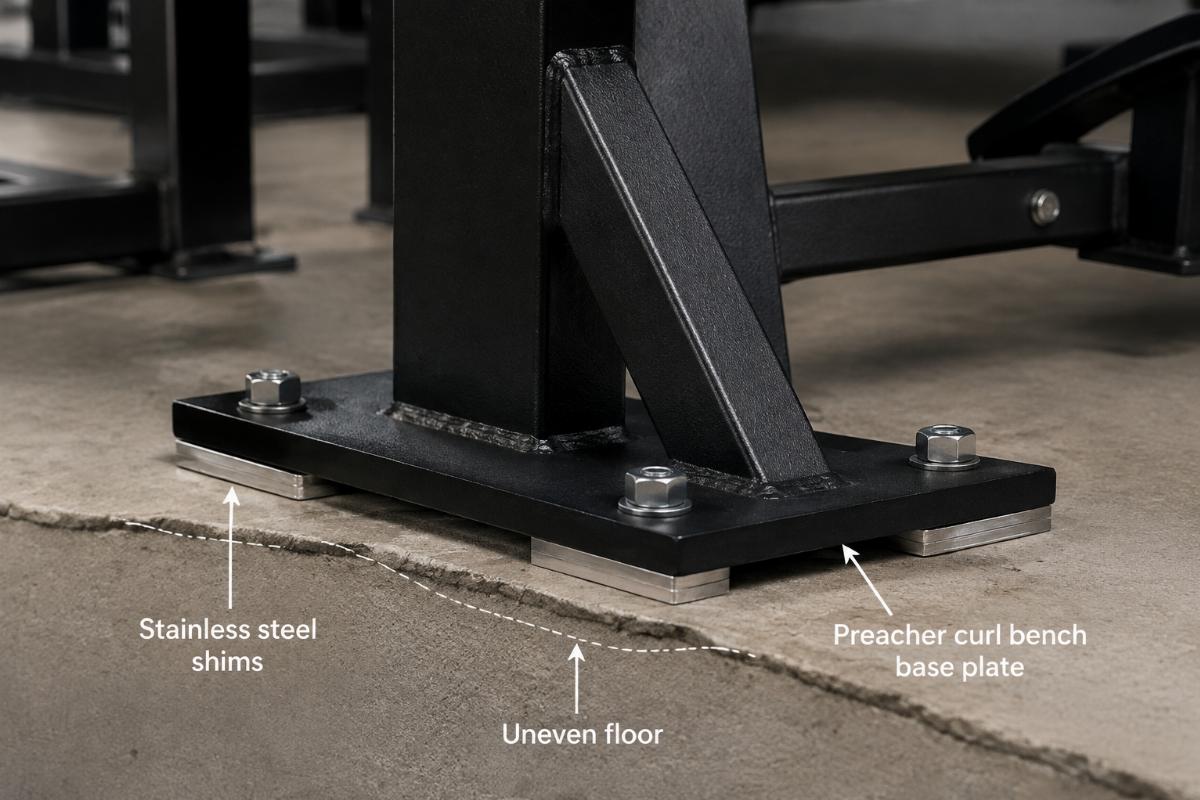
This process adds minimal time to the installation but eliminates the most common source of post-installation callbacks in hotel gym environments. [NEED_CITE: commercial gym equipment base leveling best practices per ASTM standards]
What Is the Correct Bolt Torque Sequence and Specification?
Bolt torque sequence and specification during preacher curl bench assembly directly affect hinge freedom, pad rotation smoothness, and long-term joint integrity.
There is a persistent myth among installers that tighter is always better. In reality, over-torquing the hinge bolts on a preacher curl bench is one of the fastest ways to destroy its functionality. Excessive torque compresses the hinge bushings beyond their design clearance, creating friction that restricts pad rotation. The pad then drags during use, wears prematurely on the contact surface, and forces the guest to compensate with awkward body positioning—defeating the entire purpose of the machine.
In a Thailand boutique hotel project, the assembly crew torqued all hinge bolts to the maximum value listed in a generic hardware chart, ignoring the equipment-specific specification. The result was a preacher curl bench that felt stiff from day one. Guests assumed the machine was broken. The hinge bushings showed accelerated wear patterns within the first month, and the pad rotation never recovered even after loosening.
The correct bolt torque approach during preacher curl bench assembly follows a defined sequence and range:
- Begin with the frame-to-base plate bolts. Tighten in a cross-pattern sequence—opposite corners alternately—to draw the frame down evenly without inducing twist. Apply torque in stages: first to a snug-tight value, then to the final specification.
- Proceed to the hinge bolts connecting the pad arm to the frame. These require the most care. Apply torque to the manufacturer-specified range, which is deliberately lower than the frame bolts. The hinge must rotate freely by hand after torquing, with no perceptible drag or binding.
- Finish with the pad mounting bolts. These secure the pad to the arm and should be torqued to a value that prevents pad shift under load without crushing the pad substrate.
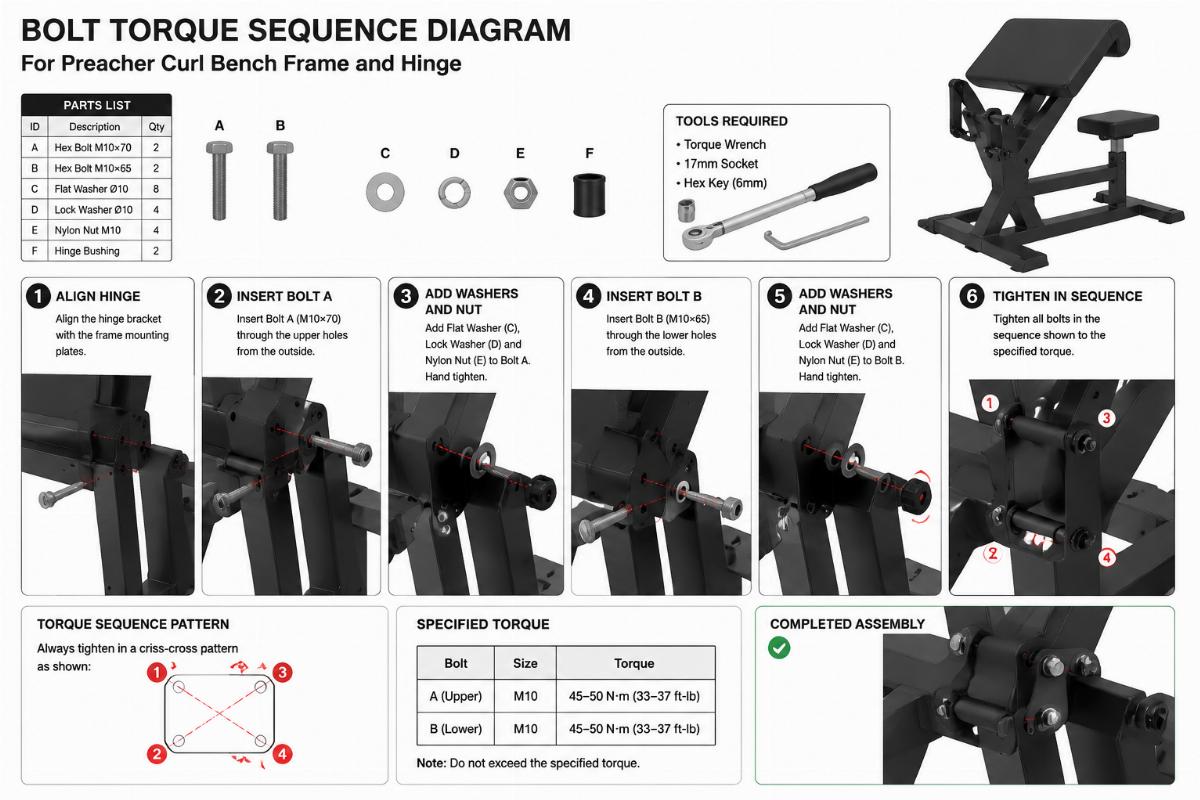
Using a calibrated torque wrench is mandatory during preacher curl bench assembly. Impact drivers and uncalibrated hand tools introduce uncontrolled force that makes specification compliance impossible. [NEED_CITE: bolt torque specification importance in fitness equipment hinge assemblies]
How Much Hinge Play Should You Leave During Assembly?
Controlled hinge play is essential in preacher curl bench assembly to ensure smooth pad rotation without compromising structural stability.
Hinge play refers to the small amount of rotational freedom built into the hinge joint between the pad arm and the frame. Too little play—caused by over-torquing, incorrect bushing selection, or misaligned mounting holes—creates binding. Too much play introduces lateral wobble, noise, and a perception of poor build quality that damages guest confidence in the equipment.
Finding the correct hinge play during preacher curl bench assembly is a balancing act that requires both specification adherence and hands-on verification. After torquing the hinge bolts to the correct value, grasp the pad and attempt to rotate it through its full range. The movement should be smooth and consistent, with no tight spots, no grinding sensation, and no lateral shift. Then, apply firm lateral pressure to the pad. There should be no perceptible side-to-side movement beyond the designed rotational axis.
In field experience across multiple Southeast Asian hotel projects, the most common hinge play error is not too much play but too little. Installers, fearing wobble complaints, over-torque the hinge bolts and eliminate the designed clearance entirely. The bench then feels rigid but performs poorly—exactly the opposite of the intended outcome.
The correct verification method during preacher curl bench assembly is a two-step check:
- Rotate the pad through its full arc manually. Listen for any clicking, grinding, or uneven resistance. Feel for consistency in the rotational force required.
- Apply lateral force at the pad edge. Confirm that the pad does not shift sideways. Any lateral movement indicates a bushing seating issue or misaligned hinge plate that must be corrected before the bench is cleared.
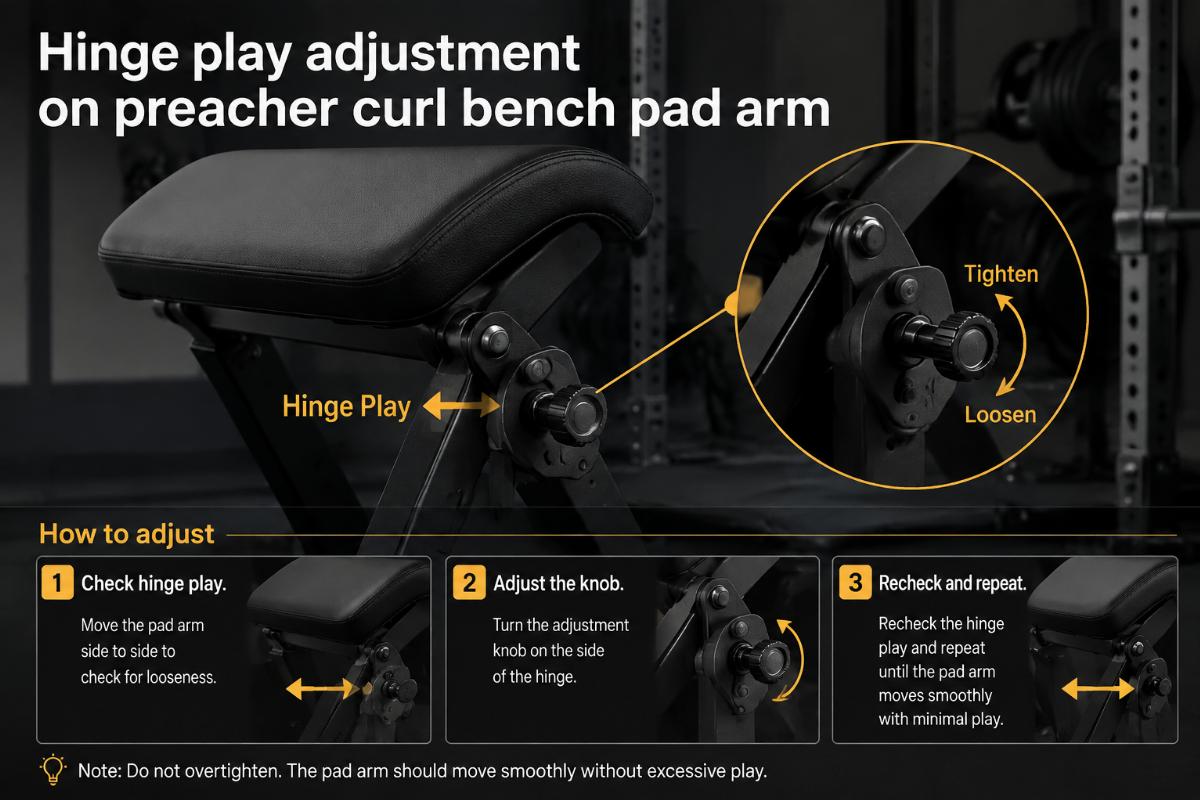
Getting this right during initial preacher curl bench assembly prevents the majority of mid-warranty service calls in hotel gym environments. [NEED_CITE: hinge play tolerance and adjustment guidelines in commercial strength equipment]
What Are the Most Common Assembly Mistakes and How to Avoid Them?
The most frequent preacher curl bench assembly mistakes are skipping pad angle calibration, over-torquing hinge bolts, ignoring floor unevenness, and failing to verify hinge play—all of which lead to costly rework and guest dissatisfaction.
Across dozens of hotel gym fit-outs, the same errors repeat with predictable consequences:
Skipping pad angle verification. Many installers assume the pad arrives pre-set from the factory and requires no post-assembly check. This is false. Transit vibration, handling impacts, and frame settling all shift the angle. The result is elbow float and guest complaints that only surface after the bench is in use—by which time rework requires full disassembly.
Over-torquing hinge bolts. As discussed, this eliminates designed hinge clearance and creates premature wear. The bench feels stiff, performs poorly, and requires service intervention that could have been avoided with a calibrated torque wrench and specification adherence.
Ignoring floor unevenness. Hotel gym slabs are rarely perfectly level. Failing to shim the base plate during preacher curl bench assembly leads to frame wobble, uneven pad wear, and accelerated loosening of fasteners. The problem often does not appear immediately, making it harder to trace back to the root cause.
Failing to verify hinge play. Without the two-step rotation and lateral check, binding or wobble goes undetected until guests report it. By then, bushing damage may have already occurred.
These mistakes are entirely avoidable with disciplined installation procedures and proper tooling. For hotel gym developers and fit-out contractors, the cost of doing preacher curl bench assembly correctly the first time is a fraction of the cost of rework, guest complaints, and reputational damage.
This is where sourcing from a manufacturer that understands installation reality makes a tangible difference. Bick supplies preacher curl benches that arrive pre-calibrated from the factory, with pad angle set and verified before shipping, hinge clearance adjusted to specification, and base plate mounting surfaces prepared for direct leveling on-site. Our technical support team works directly with hotel gym fit-out contractors to provide assembly guidance, torque specifications, and leveling procedures tailored to each project’s floor conditions. As a Shandong-based manufacturer serving hotel, resort, and commercial gym clients across multiple regions, we combine factory-direct pricing with the turnkey support that large-scale fit-outs demand—no middlemen, no specification guesswork, no post-installation surprises. [NEED_CITE: factory pre-calibration benefits for commercial gym equipment installation efficiency]
Conclusion
Preacher curl bench assembly is a calibration process, not just a bolting process. Pad angle, base leveling, bolt torque, and hinge play each demand attention and verification. Skipping any one of these steps turns a precision training tool into a source of guest frustration and operational cost. Get the assembly right, and the bench delivers exactly what hotel guests expect: smooth, effective, comfortable biceps work—rep after rep, year after year.