Incline Chest Press Container Consolidation Wholesale Supplier
Filling a container to the brim by CBM math alone is the fastest way to guarantee damaged goods at the port of discharge.
Mixing an incline chest press with other fitness equipment in one container demands far more than volume calculation — it requires understanding disassembly structure, stacking load limits, and lashing point selection to prevent in-transit deformation, paint scraping, and structural interference.
I still remember a mixed-SKU shipment bound for a gym project in the Middle East. The incline chest press, a Smith machine, and a dumbbell rack were loaded into a single 40HQ. On paper, the total CBM matched the container’s usable volume almost perfectly. When the container arrived, the chest press back pad was crushed flat by the dumbbell rack sitting on top, and two machines had wedged together so tightly that disassembly at the receiving end took days of extra labor. The rework and compensation claims ended up eating into the profit margin of the entire order [NEED_CITE: root cause analysis of fitness equipment damage in mixed container shipments]. That single experience reshaped how I approach every container consolidation fitness equipment order — CBM is just the starting point, not the finish line.
Getting the numbers right is only half the battle. Let me walk you through what actually matters when you are consolidating heavy commercial gym machines into one shipment.
Why CBM Calculation Alone Fails for Mixed Gym Equipment Containers?
Theoretical CBM and actual loadable volume are two completely different numbers, and the gap between them is where structural interference and stacking constraints live.
Most first-time importers pull out a calculator, add up the CBM of every SKU on their purchase list, compare it to the internal volume of a 40HQ — roughly 67 to 76 CBM depending on wall thickness variations — and assume they are good to go [NEED_CITE: standard internal dimensions and usable volume coefficients for 20GP and 40HQ shipping containers]. The problem is that this approach treats every piece of equipment as a perfect rectangular block that can be stacked like bricks. In reality, an incline chest press has an angled frame, protruding adjustment knobs, a seat rail that extends beyond the base footprint, and a back pad that cannot bear compressive loads from above.
When you mix this machine with flat-packed benches, plate-loaded machines, or free weight storage units, the irregular shapes create voids that waste space and, worse, create unstable stacking situations. A Smith machine frame placed beside a chest press may share a similar footprint height, but their center of gravity positions differ dramatically. During ocean transit, the constant low-frequency rolling motion shifts loads laterally. If the heavier unit is not positioned at the bottom or secured at proper structural nodes, the lighter unit takes the brunt of the movement — and that is exactly when upholstery tears, weld cracks appear, and chrome surfaces scrape against bare steel.
I have seen buyers who calculated their container consolidation fitness equipment order down to the last decimal point, only to discover at the loading site that the last pallet simply would not fit because the seat cushions on the chest press had not been removed. The cushions alone added enough bulk to push the total beyond the practical limit, and the loading crew had no time to disassemble them on the dock.
The lesson here is straightforward: before you finalize a mixed-SKU order, request the disassembled CBM from the supplier, not just the assembled dimensions. The difference between assembled and knocked-down volume for a commercial incline chest press can be substantial — often reducing the footprint by a meaningful fraction when the back pad, seat cushion, and guide rails are separated [NEED_CITE: CBM reduction ratios for commercial strength equipment after partial disassembly].
How to Disassemble Incline Chest Press for Maximum Space Saving?
The frame structure that remains after removing cushions and weight plates is the real space killer — and most buyers miss it entirely.
A common misconception is that taking off the weight plates or selectorized weight stack is enough to shrink the machine for shipping. In practice, the welded main frame, the seat adjustment rail, and the angled back support bracket are what consume the majority of the container volume. Here is a practical disassembly sequence that our production floor follows for every container consolidation fitness equipment order:
- Remove the back pad and seat cushion. These are typically attached with quick-release pins or bolt-through brackets. Pack them separately in a cardboard sleeve to prevent surface scratches.
- Detach the guide rods or linear bearings from the weight horn assembly. If the machine uses a plate-loaded design, remove the weight horns entirely — they bolt on with standard hardware.
- Unbolt the seat adjustment rail from the main base frame. This rail often extends diagonally and is the single biggest source of wasted space in the container.
- Separate the upright post from the base if the design allows. Some models use a four-bolt connection at the base plate; others require cutting a welded joint, which is not recommended for commercial-grade equipment.
- Bundle all small hardware — bolts, pins, washers, adjustment knobs — into a labeled poly bag and tape it to the main frame. Lost hardware at the receiving end is one of the most frequent complaints in mixed-SKU shipments.
After this process, the main frame can be laid flat or stood vertically against the container wall, and the separated components fill the voids between other machines. The space efficiency gain is noticeable, and it also reduces the risk of protruding parts catching on adjacent equipment during loading.
One important caveat: do not attempt to disassemble structural welds or cut any frame tubing to save space. The integrity of the machine depends on those joints, and any modification voids the warranty. If a supplier suggests cutting the frame for shipping, find another supplier.
What Are the Stacking and Load-Bearing Rules When Mixing SKUs?
Heavy steel frames go on the bottom, upholstered and precision components go on top, and nothing heavy ever rests directly on a padded surface.
This sounds obvious, but I have reviewed loading plans where a fully assembled cable crossover was placed on top of a stack of adjustable benches — with the bench upholstery taking the full compressive load. The result was permanent indentation marks across every pad in the stack.
When planning a container consolidation fitness equipment shipment, follow these stacking principles:
- Bottom layer: Main frames of plate-loaded machines, Smith machine bases, power rack uprights, and any equipment with a welded steel base and no upholstered contact surfaces. These components can bear significant compressive force without damage.
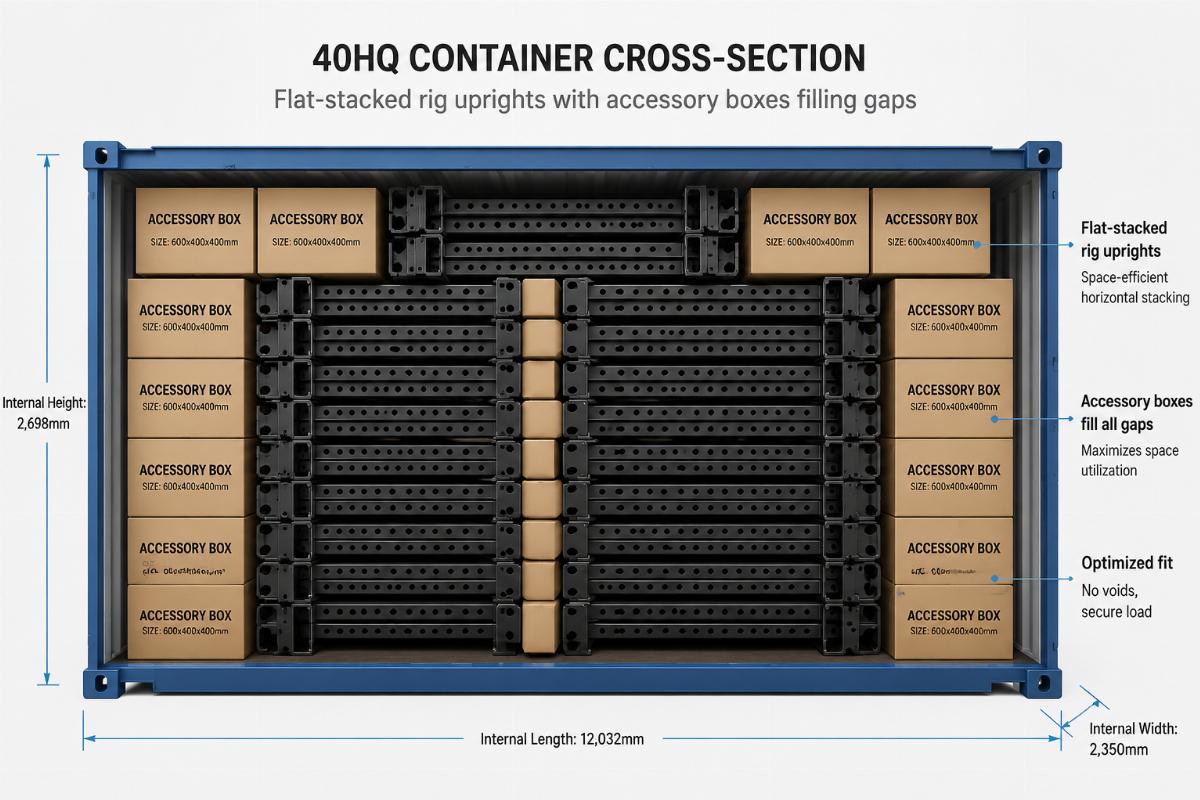
- Middle layer: Disassembled guide rods, weight horns, seat rails, and boxed accessories. These should be secured in cardboard cartons or wooden crates and placed in the gaps between bottom-layer frames.
- Top layer: Back pads, seat cushions, chrome-plated handles, selectorized weight stacks (in their own packaging), and any component with a vinyl, leather, or rubber surface. These items are vulnerable to compression, abrasion, and moisture.
- Void filling: Use foam board, corrugated cardboard dividers, or inflatable bag braces to fill any lateral gaps. A machine that can shift even a few centimeters during ocean transit will eventually contact an adjacent surface and cause damage.
The load-bearing capacity of the bottom layer depends on the frame gauge and weld quality. Commercial-grade equipment typically uses heavier steel tubing that can support stacked loads, but lighter-gauge home or light-commercial machines may deform under the weight of multiple units above them [NEED_CITE: load distribution guidelines for mixed fitness equipment container stacking per international shipping standards].
A distributor in West Africa once received a batch of mixed machines where the incline chest press frames were placed in the middle layer, with plate-loaded leg press units on top. The chest press frames bent slightly at the seat rail mounting point — not enough to be obvious during a casual inspection, but enough to make the seat adjustment mechanism bind during use. The entire batch required on-site straightening, which cost the distributor significant labor and damaged their reputation with the end-user gym.
Which Lashing Points and Materials Prevent In-Transit Damage?
Strapping too much is not safer — strapping at the wrong point can tear welds apart.
This is perhaps the most counterintuitive aspect of container consolidation fitness equipment loading. Many loading crews assume that more lashing straps equal more security. In reality, if a polyester ratchet strap is routed across a thin-gauge sheet metal panel or a decorative cover plate and then tensioned heavily, the compressive force can buckle the panel or, worse, pull the welded joint apart at the stress concentration point.
The correct approach is to identify the structural nodes of each machine — these are the points where the main frame tubing intersects, where gusset plates are welded, or where the base plate meets the upright. These nodes are designed to carry load and will not deform under strap tension. Route the lashing strap through or around these nodes, and use edge protectors or cardboard sleeves wherever the strap contacts a finished surface.
For lashing materials:
- Polyester ratchet straps are the standard choice for heavy equipment. They provide high tension capacity and resist stretching under sustained load.
- Nylon or polypropylene strapping is suitable for lighter components and boxed items but should not be used for primary load securing of heavy frames.
- Steel banding is occasionally used for very heavy plate-loaded machines but requires careful edge protection to avoid cutting into the paint or powder coating.
- Inflatable dunnage bags are excellent for filling lateral voids and preventing side-to-side movement. They conform to irregular shapes and distribute pressure evenly.
- Timber bracing — nailed or screwed to the container floor — can be used to create a physical barrier against forward movement, especially for the heaviest units placed at the front of the container near the door.
Avoid routing straps through adjustment holes, cable pulley paths, or any moving part of the machine. I once inspected a shipment where a strap had been threaded through the weight guide rod channel of a selectorized machine. The tension bent the guide rod, rendering the entire weight stack inoperable until replacement parts arrived weeks later.
How to Plan a Mixed-SKU Container from Order to Loading?
A successful container consolidation fitness equipment shipment is planned backward — from the container door to the first piece loaded at the factory.
The planning process should begin at the order confirmation stage, not at the loading dock. Here is the workflow we follow for every mixed-SKU container:
- Receive the complete SKU list with quantities. Every item must have its assembled dimensions, disassembled dimensions, gross weight, and packaging type (carton, crate, bare frame) confirmed before any CBM calculation begins.
- Calculate both assembled and disassembled CBM. Compare both figures against the target container type. If the disassembled CBM exceeds the usable volume, the order must be reduced or split into two containers — there is no safe workaround.
- Create a container loading layout diagram. This is a top-down and side-view drawing showing exactly where each machine and component goes inside the container. The diagram accounts for weight distribution (heavier items toward the center and bottom), accessibility (items needed first at destination should be loaded last), and structural compatibility (no upholstered surfaces bearing compressive loads).
- Pre-assemble and test-fit at the factory. Before the actual container arrives, the loading team dry-runs the layout on the factory floor using the actual equipment. This step catches interference issues — such as a seat rail that will not clear an adjacent frame — long before the loading day.
- Supervise the loading in person. A designated quality control representative should be present throughout the entire loading process to verify that the layout is followed, lashing points are correct, and void filling is adequate. Photograph every layer before the next layer is placed on top.
- Seal and document. Once loading is complete, record the container number, seal number, and take final photographs of the closed door. Provide the buyer with the loading diagram, photographs, and a detailed packing list that maps every item to its position inside the container.
This level of planning is what separates a shipment that arrives intact from one that generates claims and complaints. At Bick, every container consolidation fitness equipment order goes through this exact process — each machine is pre-evaluated for disassembly feasibility and stacking compatibility before the container is even booked. The loading layout diagram is shared with the buyer in advance, so there are no surprises at either end.
Conclusion
Container consolidation fitness equipment is an exercise in spatial engineering, not just arithmetic.
Volume calculation is necessary but insufficient. The real determinants of a successful mixed-SKU shipment are proper disassembly, disciplined stacking hierarchy, correct lashing point selection, and rigorous pre-loading planning. When these elements are in place, a container loaded with an incline chest press alongside Smith machines, free weight racks, and accessories will arrive at its destination with every piece intact, every surface unscratched, and every component ready for assembly.