Storage Wall Assembly Guide for Boutique Studio Owners | OEM Manufacturer
Most installers assume a storage wall is just bolted together and done. The real failure point is never the steel—it is the wall behind it and the sequence of assembly.
A proper storage wall assembly guide must begin with structural assessment of the mounting surface, proceed through fastener selection matched to substrate type, follow a calibrated mounting sequence that prevents cumulative alignment drift, and conclude with staged load testing plus a first-month re-torque protocol. Skipping any of these steps is the single largest reason boutique studios face wobbling racks, deformed modules, and costly rework within the first year of operation.
I still remember a job at a boutique functional training studio in a converted warehouse in Ningbo. The owner wanted the storage wall up in a single day because the grand opening was booked. I rushed the anchoring phase, used standard expansion bolts on what turned out to be hollow brick, and mounted the modules board-first instead of bracket-first. Within weeks the entire unit swayed under normal plate-loading. We tore it down, replaced the fasteners with chemical anchors, re-leveled every bracket, and ate the material and labor cost ourselves. That client never reordered. Since then I have treated every bolt torque value and every mounting step as non-negotiable, and I write every storage wall assembly guide around those hard-learned field realities.
Let me walk you through the full process the way it should be done on site.
How Do You Assess Wall Structure Before Installing a Storage Wall?
The substrate type determines everything: fastener choice, load capacity, and long-term stability. Concrete, solid brick, hollow brick, and light-gauge steel framing each demand a completely different anchoring strategy. [NEED_CITE: substrate classification and anchor suitability per ANSI/ETAG anchors]
Before a single bracket touches the wall, you must complete three checks:
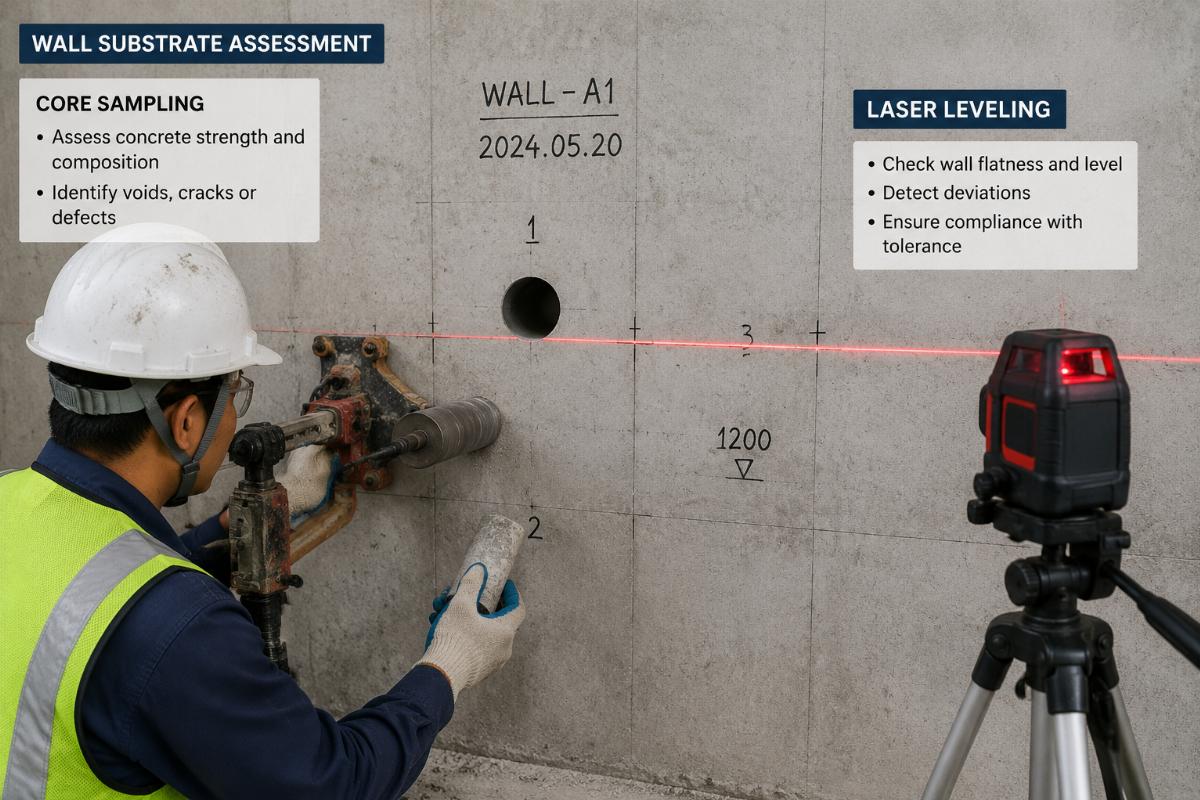
- Substrate identification. Tap-test and, where possible, core-sample the wall to confirm whether it is poured concrete, solid clay brick, hollow concrete block, or metal stud with gypsum board. Hollow substrates cannot rely on friction-based expansion anchors. [NEED_CITE: pull-out strength comparison across masonry substrate types]
- Load path calculation. Estimate the total dead load (steel frame plus stored plates, bumper plates, slam balls) and multiply by a safety factor appropriate for dynamic gym use. A storage wall holding competition bumper plates exerts noticeably higher point loads than one storing standard iron plates.
- Mounting plane verification. Use a long spirit level or laser line to check flatness across the full wall. Deviations beyond a few millimeters will compound once multiple modules are hung.
In one boutique studio project in Southeast Asia, the wall looked solid but was actually a double layer of gypsum over light-gauge steel studs. Standard wedge anchors pulled through under partial load. The fix required through-bolting with backing plates—something that should have been identified during the initial assessment, not after the first load test.
What Is the Correct Mounting Sequence for Modular Storage Units?
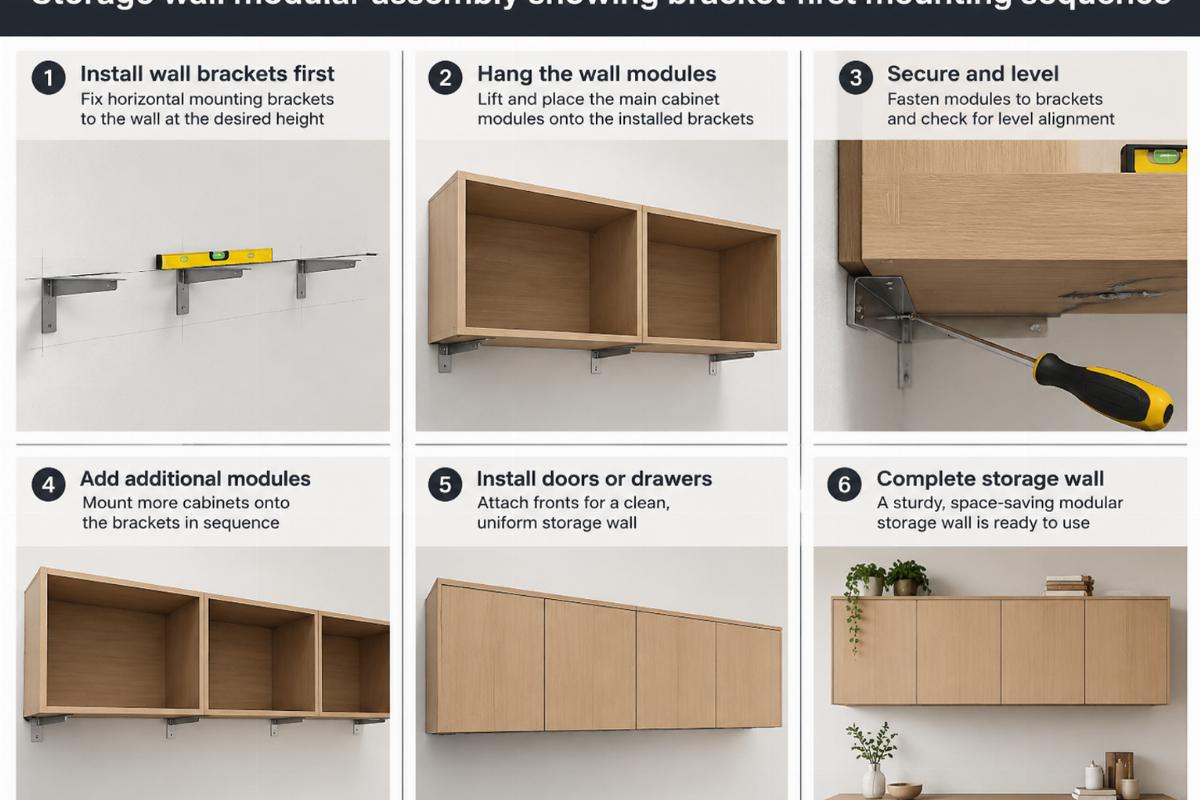
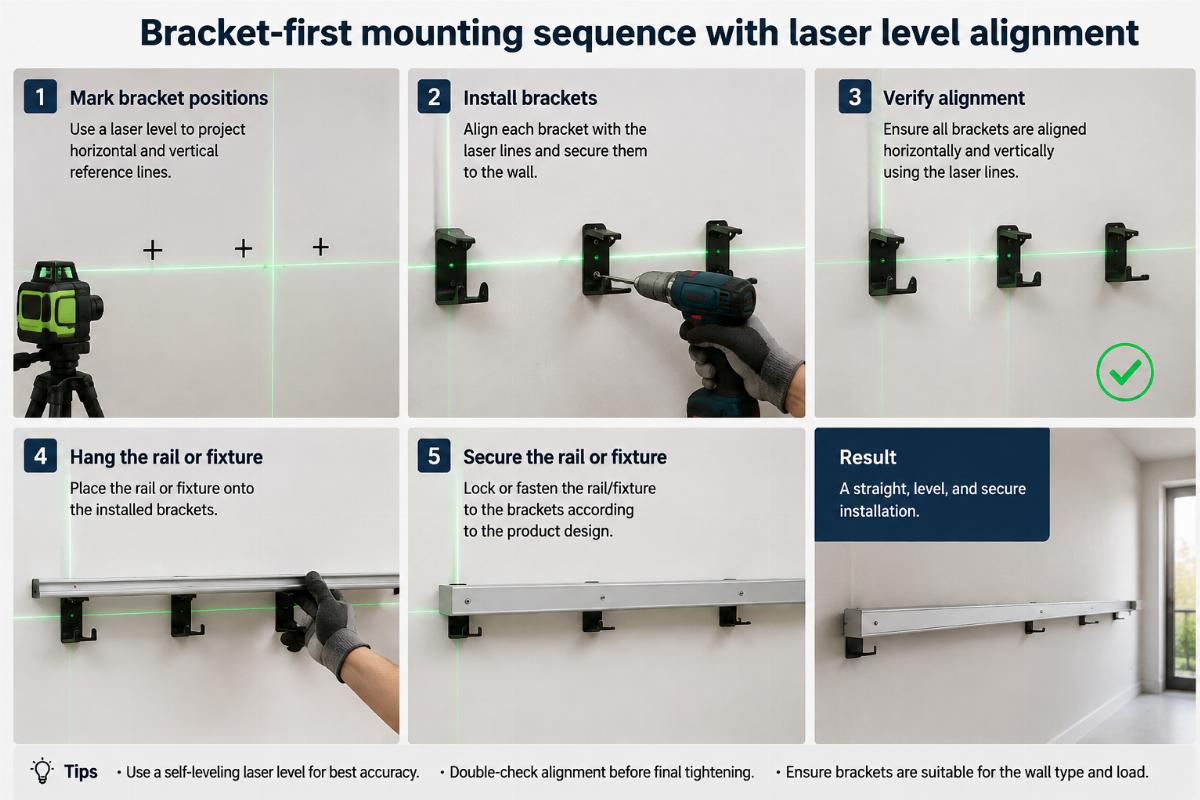
Always fix the main brackets first, level and plumb them independently, and only then hang the modular panels. Reversing this order guarantees cumulative alignment error. [NEED_CITE: modular rack assembly tolerance stacking principles]
The correct sequence runs as follows:
- Mark bracket positions. Transfer the layout from the manufacturer’s template onto the wall, confirming stud or anchor locations against the substrate assessment.
- Install brackets loosely. Attach each bracket with its fasteners hand-tight only. Do not fully torque yet.
- Level and plumb the bracket line. Use a laser level spanning the full width. Adjust each bracket until the entire row sits on one true plane.
- Final torque. Once alignment is confirmed, torque every fastener to the manufacturer’s specification in a cross-pattern sequence to avoid pulling one side tighter than the other.
- Hang modular panels. Slide each storage module onto the calibrated brackets. Because the brackets are already true, the panels will seat evenly without forcing.
- Secure panels to brackets. Fasten each module with its designated locking pins or secondary bolts.
A common mistake I see repeatedly is installers hanging the first panel, using it as a reference for the next bracket, and repeating down the line. By the fourth or fifth module, the cumulative drift is visible to the naked eye and the top modules no longer align with the bottom ones. The only fix is a full teardown.
How Do You Choose the Right Fasteners for Different Wall Types?
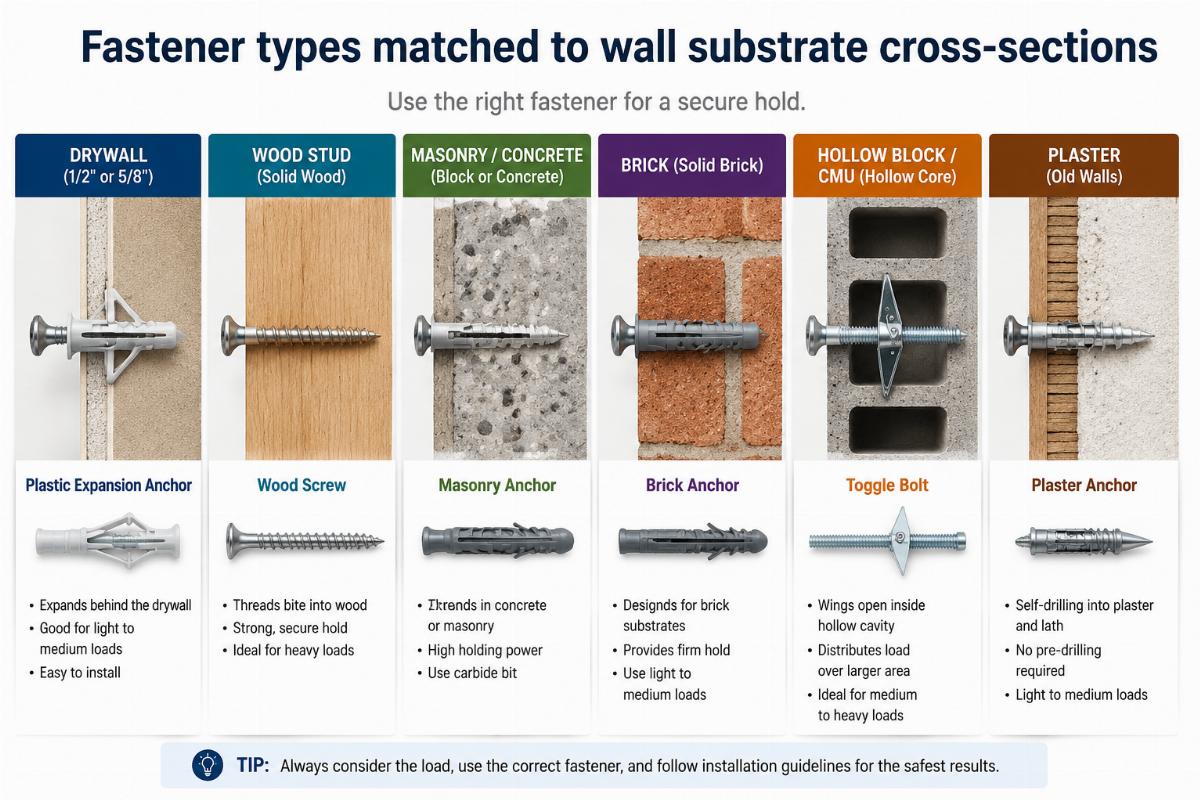
Fastener selection is not a generic decision. The substrate dictates the anchor type, and the anchor type dictates the achievable pull-out resistance. Using the wrong fastener on the wrong wall is the leading cause of storage wall detachment failures. [NEED_CITE: anchor selection matrix per ISO and ETAG standards for masonry and concrete]
The storage wall assembly guide must match fastener to substrate without exception:
- Poured concrete. Wedge anchors or sleeve anchors of appropriate diameter and embedment depth deliver reliable friction-based holding. Chemical anchors provide even higher capacity and are preferred for heavy dynamic loads.
- Solid clay brick. Sleeve anchors or chemical anchors work well. Avoid wedge anchors in older or softer brick where splitting risk exists.
- Hollow concrete block. Chemical anchors with mesh sleeves are the correct choice. Mechanical expansion anchors cannot develop full capacity in hollow cavities. [NEED_CITE: chemical anchor performance in hollow masonry per technical approval data]
- Light-gauge steel framing. Through-bolts with large backing plates are mandatory. No expansion anchor or chemical anchor can develop meaningful holding in thin-gauge metal alone.
Each fastener type carries a published pull-out rating tested under controlled conditions. Real-world capacity drops when the hole is oversized, dusty, or drilled at an angle. Always clean the hole with compressed air before inserting the anchor, and never reuse a drilled hole.
Bick storage wall modules ship with a complete fastener specification sheet matched to the most common substrate types, along with pull-out test references. This documentation eliminates guesswork on site and ensures that the installed system performs to its rated capacity.
What Load Testing and Maintenance Steps Ensure Long-Term Stability?
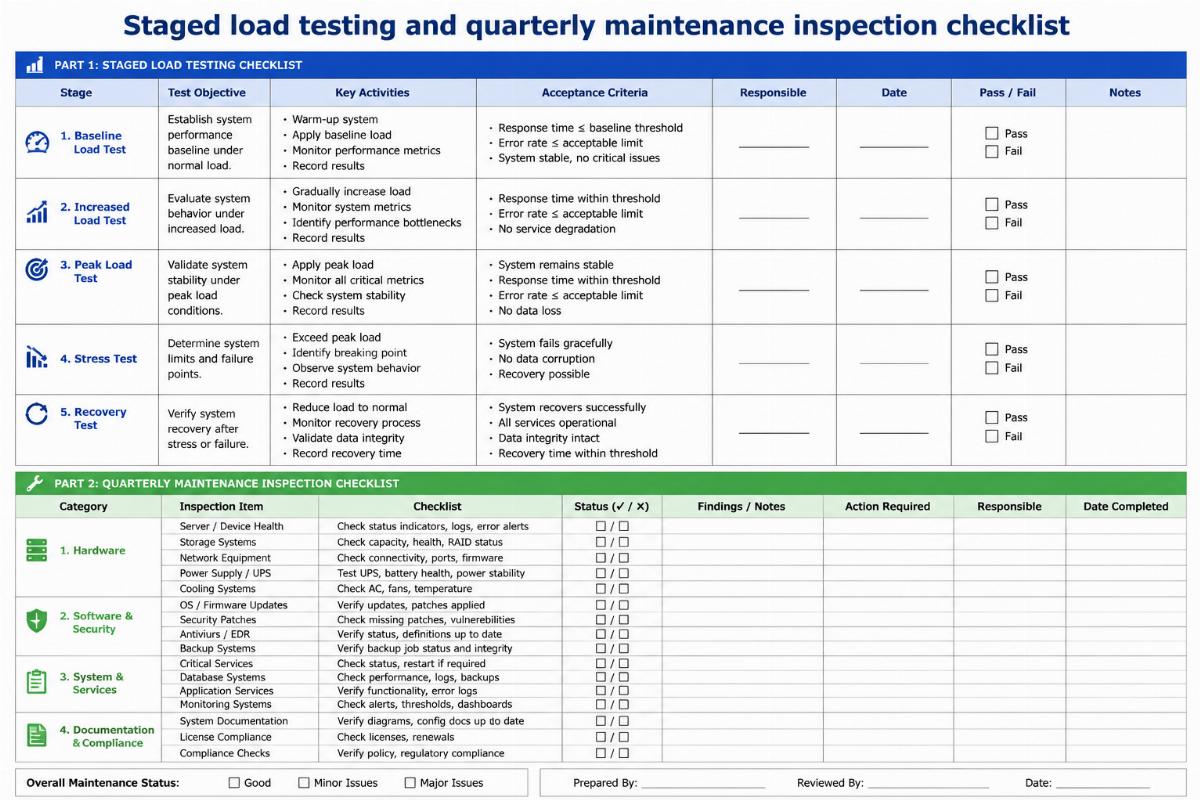
A storage wall is not considered installed until it has passed a staged load test and the fasteners have been re-torqued after the first month of service. Dynamic gym loading behaves differently from static warehouse loading, and only progressive testing reveals hidden weaknesses. [NEED_CITE: dynamic load testing protocol for gym storage equipment per EN/ASTM fitness equipment safety standards]
The post-installation protocol should follow this sequence:
- Stage one: partial load. Load the bottom modules to roughly half their rated capacity. Inspect every bracket, every fastener, and every panel connection for movement, creaking, or visible gap formation.
- Stage two: full rated load. Bring all modules to their published rated capacity. Hold for an extended period and re-inspect.
- Stage three: dynamic simulation. Have staff load and unload plates at normal gym speed, including occasional plate drops from waist height onto the storage pegs. Observe for any shift or vibration beyond normal.
- First-month re-torque. After roughly a month of regular use, re-torque every primary fastener. Initial loading causes micro-settlement in the anchor and substrate interface, which reduces clamping force. Re-torque restores it. [NEED_CITE: bolt preload relaxation in anchored connections under cyclic loading]
- Quarterly inspection. Thereafter, check all connections on a quarterly basis. Look for elongated bolt holes, cracked welds on module frames, and any deformation of storage pegs.
A连锁 gym operator in the Middle East once reported peg deformation on a competitor’s storage wall within months. Investigation showed the pegs were rated for standard iron plates but the facility used competition bumper plates with larger diameters and higher point loads. The mismatch between rated capacity and actual use pattern was the root cause. Bick storage wall modules are rated with clear load tables distinguishing plate types, and the installation manual includes a load-matching checklist to prevent this exact scenario.
Conclusion
A storage wall that lasts is a storage wall that was assessed, sequenced, fastened, and tested correctly from day one. The storage wall assembly guide above reflects real field experience across multiple studio formats and substrate conditions. Structural assessment prevents wrong-anchor failures. Bracket-first sequencing eliminates alignment drift. Substrate-matched fasteners secure the system to its rated capacity. Staged load testing and first-month re-torque lock in long-term stability. Follow these steps and the wall will perform as designed for years of heavy gym use.